How To Get Into Mountain Biking
Starting a new hobby or sport can be both exciting and daunting. With mountain biking, it might be the excitement of the downhills, or the joy of exploring the backcountry on two wheels that draws you in. Whatever your motivation for getting into mountain biking, you might be feeling a bit ‘now what?’ after making your decision. Where do you start and what basics do you need to know?
Luckily, as experts at keeping mountain bikers protected, D3O has plenty of tips and advice on how to get started in mountain biking.
Find your style
There are a few different styles of mountain biking, so there’s definitely something out there to suit you. As a beginner, you’ll likely start with simple trails (more on that later), but if there’s a discipline you’re keen to try, it’s worth setting your eyes on the prize.
- Cross Country. The most common type of mountain biking, you can push hard or take it easy on cross country trails. Often abbreviated to XC, cross country trails typically wind through landscapes and give you the chance to take in the scenery as well as getting an exciting ride in too. Cross Country riders commonly wear lycra and focus a lot of energy on riding fast uphill. The most common XC bikes are the classic Hardtail or full suspension bikes with travel ranging from 90-120mm.
- Trail / Enduro. Trail and Enduro riding is a mix between more technical downhill trails and technical uphill trails. These riders tend to prefer more advanced descents that require larger suspension travel bikes. Not into the lycra look? Baggies and “big travel” bikes go hand in hand! The most common Trail/Enduro bikes have full suspension travel ranging from 150-170mm.
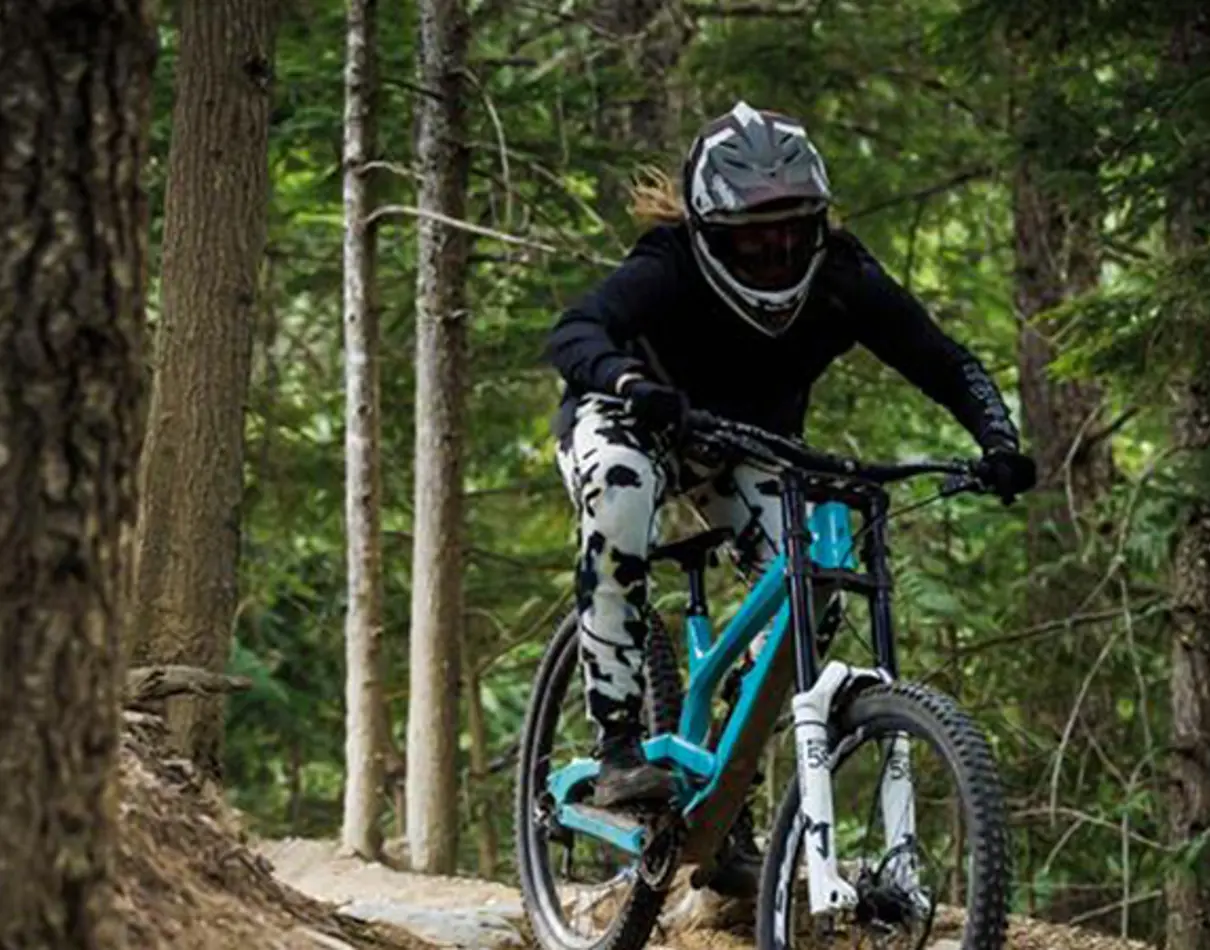
- Downhill. Downhill riders do exactly as the name suggests! Downhill mountain biking is fast and intense. You have to navigate tricky terrain at high speed and control your bike down steep descents. You often have to take a bike lift to the top of a downhill trail to avoid a hefty hike, or use an e-bike, but the exhilarating rush of flying downhill more than makes up for it. If you’re riding downhill, you’ll need all the D3O protected gear you can get your hands on. The most common Downhill bikes have full suspension travel ranging from 160-200mm.
Beginner-friendly trails
Most beginners will start with XC trails that are labeled green or blue. Green trails are true beginner trails, with gentle inclines and minimal downhills, smooth corners and easy obstacles. Blue trails are ones to try after you’re completed a handful of green ones and are ready to step up. These are slightly more difficult and a good way to see how far you’ve come.
Later on, you can tackle red, black, and even doubleblack trails if you want! But remember there’s nothing wrong with finding a level you’re comfortable riding at. If you like to ride at nothing more tricky than a blue or red, that’s absolutely your call.
Visit a trail center or bike park and you’ll be able to check out trails of all levels to assess what you’re comfortable with. Better to start off with something you find easy and scale up than throw yourself in at the deep end and potentially end up getting hurt.
Gear and bike set up
You can’t get started in mountain biking without a mountain bike and protective gear. You might find it best to visit a trail center or bike park initially and rent a mountain bike to start. You’ll be able to get a feel for the type of bike you like, frame and tire size, and generally practice before you commit to buying your first one. Staff can also help with recommendations and making sure you get one that is correctly sized for you.
When it comes to safety gear, always choose brands that use D3O mountain bike protective gear. D3O offers the very best protection while being soft and flexible. This means it doesn’t impede your range of movement and so is perfectly designed for mountain biking. It’s also light enough to wear all day, and you can opt for extra benefits like breathability or enhanced flexibility. For a basic set up, opt for mountain bike knee pads and mountain bike elbow pads to keep these vulnerable joints safe. Don’t forget your helmet!
Build your fitness and condition
You might have a good level of cardio fitness from hitting the gym, but riding the trails all day requires a completely different type of fitness and conditioning. To start with, your muscles simply won’t be used to being deployed for mountain biking. It’s a full body and physical sport, using everything from your limbs to your back and core to get a good ride. If you’re not used to spending time on the saddle or in an attack position, this too can be a little uncomfortable while you adjust.
Luckily, the more you ride, you’ll find that your condition quickly catches up, especially if you already have a good level of fitness. Soon your muscles will be able to handle a full day of riding with just the usual amount of tiredness at the end of the day, rather than feeling completely wiped out each time. Embrace the soreness and you’ll be better for it - just make sure you get a good stretch in after each ride to help loosen up those muscles.
Find friends or local groups
If your friends are the ones who’ve persuaded or inspired you to give mountain biking a go, make sure you get out on the trails with them. Even if they are experienced, don’t be afraid to ride out with them. Everyone was a beginner once, and riding with people who are more experienced helps you to learn. Watch how they tackle lines and obstacles, and they’ll be able to give you tips and advice on your riding style and general encouragement too.
Local mountain biking groups are also good to try out if you don’t have anyone close to you to ride with. Many groups are welcoming to beginners, offering the chance to try easy trails together - and they’re a great way to make friends sharing a love for mountain biking too!
Take a lesson or join a clinic
For those lucky enough to live near a trail center or bike park, you can get started in mountain biking with a lesson or clinic. These sessions will give you an overview of the essentials, show you how to tackle basic terrain and obstacles, and generally give you a quick 101 on how to mountain bike.
These are a great idea if you’re a little nervous about starting or want to have some skills under your belt before you ride out with friends or a local group. Lessons and clinics can help build your confidence and you can even work on specific skills like how to tackle downhills and jumps.
Explore and practice
There’s no shortcut to getting better at mountain biking other than by practicing. Fortunately, the sport is designed to get you out exploring and trying new trails and obstacles, so it’s no hardship to be heading out regularly. Being adventurous and curious will make you a better rider in no time, as you explore, experiment and test yourself while having a fun day out.
You can also revisit trails to practice on again and again, mastering the art of cornering, downhill speed, obstacles and more, so you know what level you’re at and when it’s time to move up.
Learn basic rules and lingo
When you first start out, you’ll likely hear people throwing around all kinds of terms you’ve never heard before. Mountain bikers almost have their own language or shorthand, and the quicker you pick it up the easier you’ll be able to engage in trail chat!
A few key terms to know:
- Rock garden. A portion of a trail that has lots of rocks to navigate.
- Berm. Banked corner on a bike trail or track - you can typically ride this at speed through the section.
- Singletrack. A single-file trail for riding on.
- Doubletrack. A trail wide enough to ride side by side or two abreast.
- OTB. ‘Over the bars’ - a term for when you fall off straight over the front of your bike. Not recommended!
- Hardtail. A type of mountain bike that only has front suspension and no back, hence it has a ‘hard tail’ rear.
- Bail. When you have to make a conscious decision to leap off your bike in order to avoid a worse accident.
- Dab. Lifting your foot off a pedal to help balance through a corner.
- Pump. Pushing the front tire down into the ground creates a lift and more energy through the bike (note: this can take a bit of trial and error to get right).
- Gnarly. Describes difficult or tough terrain, but can also mean a trail was exhilarating to ride because of this!
- Trail Chatter. The vibrations and feedback that are felt through the bike, handlebars and pedals as you ride on rough terrain. To avoid excessive limb fatigue from trail chatter, make sure you wear properly padded mountain bike gloves and protective mountain bike shoes.
There’s also some trail etiquette to keep in mind. This is especially important if you’re riding on a popular or busy trail.
- Shout ahead. If there are other people on the trail (slower bikers, horse riders, walkers, runners etc), don’t sneak up on them. A quick shout of ‘excuse me’ or ‘bike behind you’ gives people the chance to move out of your way or just be aware of your approach.
- Ride on the right. Stay on the right just like you would while driving, to let riders in the opposite direction pass easily and not to block the trail.
Pack and prepare. Bring food, water, a multi tool, spare inner tubes, basic first aid and more in a backpack. You never know what you or a friend might need while out!